Jessi (Cole) Walters
Wingbone calls have been around a heck of a long time; Native Americans are among the first reported to make and use them to call in lovesick gobblers.
I believe they're one of the coolest ways to remember a hunt and honor a turkey, and all in all you can get one done with about 2-3 hours of work (with some waiting in between.) You don't need a whole lot of materials and tools, and you can be pretty endlessly creative with how you want yours to look.
Here's a basic walkthrough.
Tools You Need to Make a Wingbone Call
- Knife
- Strong clippers for removing the bones
- Long thin object like a toothpick or small bottlebrush for cleaning the inside of the bones
- Bleach or tea for dying
- Small hand saw
- Dremel tool, a bit for removing and shaping bone, and sandpaper
- Super glue
- Wood glue + fine wood shavings or dust
- Thread, permanent markers, or whatever else you want for decoration
Removing the Turkey Wing Bones
This one is best explained visually; here we have Quaker Boy's Ernie Callendrelli showing us how to remove those three (the small, medium, and large) wing bones from a turkey.
Cleaning the Wing Bones
Cleaning the wing bones is, I believe, the most tedious part. You're going to be putting these in your mouth and sucking in, so you want to be sure it's clean as a whistle. And the meat and cartilage in some of these bones can be pretty stubborn.
Here's the steps to cleaning:
- Boil the bones for about 5 minutes; this will help the meat and cartilage come off easier
- Scrape the meat off the outside. You can use your fingers and fingernails to do this gently or an old toothbrush or even a knife if you're careful not to knick the bone.
- Remove any cartilage in the inside. Sometimes this comes out easily, but most times you'll need to get a little tiny bottle brush or extra long toothpick to reach and push that cartilage out.
- Once you've got three clean-as-a-whistle bones, you're ready for the next step.
Dyeing the Wing Bones
The bones without any sort of dye can look a bit patchy and gross, so most folks dye them either straight white (bone white) or a sort of brown color. Here's how.
- For a white color, put the bones in a bowl of bleach. This can take anywhere from 30 minutes to a couple of hours to get to the color you'd like. Pull them out and rinse well when you're satisfied. (Keep in mind the color will look much whiter when it's dry.)
- For a brown color, put the bones in a bowl of steeped tea. This one might take a bit longer; keep them in for a couple of hours or until they're the desired brown you're going for. Rinse well and lay out to dry.

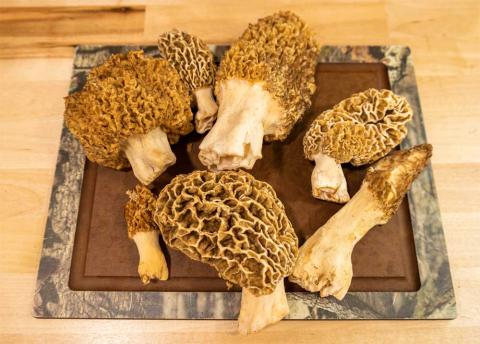
Wingbones after they've been cleaned and dyed; these have not yet been trimmed and fitted together.
Fitting the Wing Bones
If you pull out all six wing bones from one turkey, you can mix and play with the bones to get the right fit for each call. You definitely don't have to (and probably won't want to) match up the bones from each specific wing, etc. Sometimes the bones just fit better with other pieces. See the above picture for how the three pieces should fit together. (Large into medium into thinnest)
This stage is where the Dremel is going to be your best friend. Here's the steps to follow.
- First clear out all of that cartilage in the large bone. Just use your Dremel and a proper bit to clear all of that out of the inside. Be careful not to get the bone itself too thin anywhere. Clearing this part will make the call look nicer and will aid with that essential air flow the call will need.
- Use a small saw to start helping fit the pieces together. You'll likely need to trim all three pieces to get close to the right fit and you can finish the fit out with the Dremel. You want the fit to be tight, not loose! So be careful with how much you're removing. You also want each piece to go in to the other at least half an inch for the glue to set and hold properly.
Glueing the Wing Bones
- First you'll want to super glue the pieces together and let those set for at least 30 minutes or so to be safe. Put a little on the outside of the part of each piece that's going inside the other. If the pieces fit right, they should be tight enough where the superglue won't have to be thick or goopy.
- Once the super glue has set, it's time to get the wood glue and sawdust. This step helps seal the bones together and make them airtight. Mix the glue and sawdust and go around each connecting place on the call; do not allow any holes or places where air could escape.
- The wood glue takes longer to set, so set this aside for at least a few hours before you come back to it.
Decorating Ideas and Tips
Here's where you can get fun. Use a thicker thread or floss or even leather to wrap around the connecting points and hide the wood glue. I like to ensure the thread won't unravel on me by using some UV fly-tying epoxy around the thread and hitting it with the UV flashlight. Other folks rely on superglue where the thread finishes and then clear nail polish around the whole thread area. There's plenty of methods that would work to keep the thread on.
You can decorate further by using a thin Sharpie pen to draw or write on the wingbone. You can write the year or a description of the hunt or your signature or whatever you'd like. Draw a feather, turkey tracks, whatever your heart desires.
Again, this is where you'll have to "do you" and make it your own. Attach it to a leather lanyard or try scrimshaw or other artistic methods to your heart's desire.
Enjoy your new wingbone call! Learning to call on it is another thing entirely. It's similar to a trumpet call and when done right can offer a really different and enticing hen yelp in the woods. Kill one turkey and use its bones to call in another--then you'll really be a bonafide hunter.